As a dad, sometimes we just have the urge as DIY masters (or not) to build something on our own. Woodworking is in our DNA, after all. (Not necessarily professional level woodworking, but at least the basics.) Woodworking is better than time spent playing on your computer, after all.
For your next project, maybe you’re looking to create something truly useful. You tried the traditional spice rack, but since everyone in your house is always to too tired to cook after work, the spices just sit and collect dust. (The only time the spice rack gets used is when you season the steaks and show off your mad grilling skills.)
Then there was the treehouse that the kids were so excited about using … until they got bored with it. (At least the squirrels found a good home.)
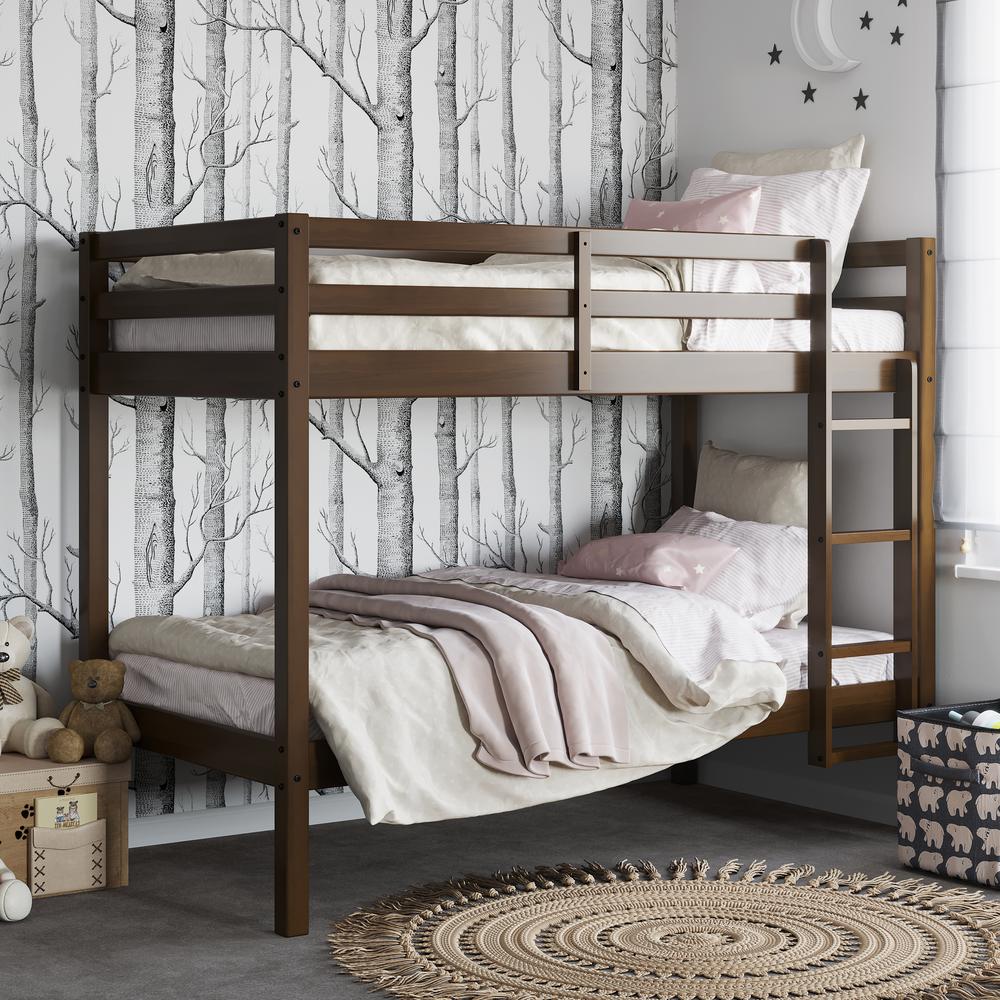
But now you’re looking for a truly practical project; something that will receive daily use. Consider DIY bunk beds. Not only will kids love bunk beds when sharing a room, but it gives them far more free space on the floor of the bedroom to spread clothes and toys. There’s nothing a kid loves more than making a mess. And there’s nothing you love more than navigating the minefield of crap on the bedroom floor in the middle of the night when the kid is crying for a glass of water. (F***ing LEGOs on bare feet are the work of the devil.)
Building homemade bunk beds will give you some serious dad cred, allowing you to slack off a bit and not have to try so hard in a few other areas. For example, successfully complete DIY bunk beds, and you can dial down the intensity of the bedtime stories. (Trust us, no one wants to see your full musical production of Hop on Pop at bedtime or hear you rap The Gruffalo, unless you can at least match the skills of MC Grammar.)

How to Build a DIY Bunk Bed
1-Do the Planning
Our instructions for DIY bunk beds will be pretty simple in nature. However, you can create all kinds of accents and far more detailed designs if desired. You can find many different instruction sets regarding bunk bed plans for sale online to spark your creativity.
Measure the height of the ceiling in the kids’ bedroom. You have to give the kid in the top bunk plenty of room to sit up when the alarm goes off without causing a concussion every morning. Don’t forget to add in the thickness of the mattress to your calculations. (And if the kids are still afraid of heights, maybe go down another foot.)
If you’d rather watch someone build homemade bunk beds versus simply reading about it, Jay’s Custom Creations has a very helpful DIY bunk beds video, as well as matching detailed plans for DIY bunk beds that you can buy.
2-Collect the Materials
For homemade bunk beds, you can save some money by using standard pinewood 2-by-2s, 2-by-4s and 2-by-6s. You will want a drill with a screwdriver bit, wood glue, sander, and a circular hand saw or a table saw.
And for the love of God, measure the doorway. If you want to build the DIY bunk beds outdoors, make sure they’ll fit through the front door and the bedroom doorway. Otherwise, if they’re going to be too large, build them inside the room. (Cut the pieces outside, though, unless you want sawdust to embed itself in the carpeting and still be there well after the kids grow up and go to college and you convert the space into the exercise room that you’ve always wanted but never plan to actually use.)

3-Build the Box
For the box that will hold the mattress, you will want to use 2-by-6s or 2-by-4s, depending on the thickness of the mattress. (The mattress thickness should extend at least a few inches over the top of the box.)
Figure out what sizes of mattresses you want to use on the bunk beds and cut the boards to fit.
- Twin: 39×75 inches
- Twin XL: 39×80 inches
- Full: 54×75 inches
- Full XL: 54×80 inches
Build the interior of the box so that you have 1 to 2 inches of free space all around the mattress. This allows for space for blankets to hang over the edge of the mattress when the kids will make the bunk beds. (Stop snickering.)
Remember that each piece of lumber has 1.5 inches of width (not 2 inches). For a twin mattress, make the long sides 77 to 79 inches in length and the short sides 38 to 40 inches in width, so the short side attaches to the inside of the long sides.
Sand the pieces to remove rough spots, printing, marks, and sharp edges. Screw and glue or nail and glue them together. (Always use glue with the screws or brad nails. Kids are notoriously rough on bunk beds.)
4-Build the Base and Legs
For the base of the box, you can attach plywood to the bottom of each box, or you can use 2-by-2s, 2-by-4s, or 1-by-3s to create slats.
To make simple legs, you can attach 2-by-4s and 2-by-6s together in an L shape. These legs should extend roughly 12 to 18 inches over the top of where the upper box will sit.
Stand the legs in the room where you want them. Use 2-by-4s to connect them to each other (on the short side of the bed), creating ladder rungs on both sides.
Here’s where you need to do some math. If the bottom of the lower box will be 6 inches off the floor and the bottom of the upper box will be 54 inches off the floor, you’ll want the bottom of the rungs for the ladder at 22 and 38 inches. Add one more rung at the top of the legs for stability.
Then attach the boxes to the legs at the desired height. Use spare pieces of wood as braces on the inside of the legs cut to the proper length to help support the weight of the upper box as you’re attaching it. (If the upper box is 54 inches off the floor, use 54-inch braces inside the legs.) Follow the same procedure for the lower box. Having a second person for this part is helpful.

5-Finishing Touches
Some people like to build guard rails on the upper bunk. This can be accomplished at the same height as the upper ladder rung for a consistent look. If the beds will be against the wall, just one side needs a rail.
Adding storage bins, drawers, or a rollaway bed underneath the lower bunk is another option. If you plan to do this, calculate the size of the storage you want before you start putting the beds together, and hang the lower box at the proper height to accommodate the storage, adjusting the height of the upper box and the ladder rungs accordingly.
We’d recommend painting the wood, although some people will choose to stain it if they’re using high-quality wood.
Kids will love picking fun colors for the DIY bunk beds, and they can even help with the painting outside. But if you’re going to let them help you paint the bunk beds when they’re already inside the room … don’t. Just don’t.
Best Products for Homemade Bunk Beds

2×4 x 8 Foot Lumber
No woodworking project can be successful without the right lumber. You may want to go with more expensive wood when you’re planning for how to build a bunk bed, especially if you want to stain it. Then again, there’s a 50/50 chance the kids will destroy it at some point, so maybe cheaper is better.
Buy for $4 Per Piece on Home Depot

Flat Head Phillips Wood Screws
You can never have enough wood screws on hand for your woodworking projects.
But don’t settle for cheap screws for this project, or you’re going to strip the heads, leaving them stuck forever, not quite in as far as they should be, pissing you off to no end and leading to an impressive string of cuss words. (We understand that all dad projects should involve some form of swearing at some point during the process, but the project shouldn’t be 100% profanity, so buy decent screws.)

Gorilla Wood Glue
If you’re assembling your DIY bunk beds inside the kids’ room, always remember what my dad taught me about wood glue when I was a kid: A little goes a long way. (Of course, he told me this after I used half a bottle on one joint, leading to a huge mess on the floor that I had to clean up, but I did remember the advice, even if it was a little late. Dad was a big believer in learning by doing … and he always said learning was much easier after screwing something the f*** up the first time.)

DeWalt 20V MAX Cordless Drill Kit
If you don’t have a cordless drill, this homemade bunk beds project is the perfect excuse to buy one. (We would suggest that you ask for a high-quality drill for the best Father’s Day gift, but we all know how that usually goes. Sure, we appreciate receiving another #1 Dad coffee mug — it never hurts to advertise — but this drill would be better.)
With two rechargeable batteries included, you’ll always have a fresh battery available for your projects. The downside? No more excuses that you don’t have the right tools when you’re trying to spend Saturday afternoon napping instead of fixing things. Make sure you have both batteries fully charged at all times, just having them sitting on a shelf does nobody any good.

DeWalt 20V MAX Brad Nailer
For this type of project, a brad nailer probably will be easier to handle than the drill and screws. However, if you expect the kids to use the bunk beds as some sort of launching point for practicing all-star wrestling moves, the screws should hold together better than these brad nails and glue, especially on the ladder rungs.
Hell, get both DeWalt power tools. They share the same battery system, and the kids are going to break many, many things over the next several years, so you can never have enough power tools on hand for repairs.

DeWalt Compact Jobsite Table Saw
We love this table saw, as it’s small enough to take with you wherever you need to work, but it’s also big and powerful enough to do almost any woodworking job you have in the plans.
It’s tough enough to stand up to regular use, should you decide to take on some tougher projects after finishing your current bunk bed plans. Take safety measures with this table saw, such as always using the safety guard. Power saws don’t give your fingers a second chance if you make a mistake.

DeWalt Orbit Sander
Sanding is key for how to build a bunk bed that’s safe to use. (Attaching all the pieces securely is key too, but you already knew that.)
Without sanding, you just know your accident-prone kid is going to find a way to end up with a splinter 24 seconds after climbing into the bed, which will lead to an hour of wailing about something so small you can’t even see it. And you’ll receive that look your wife saves for the times when she says things like, “Are you sure this wood is safe to use and it won’t give the kids splinters?” before you started the project. Sigh.

South Shore Ulysses Navy Blue Twin Bunk Bed
Maybe you have studied our plans for DIY bunk beds, and you have decided it’s too big of a project for you. No worries.
With this homemade bunk beds kit, you’ll receive everything you need to create bunk beds that look great without having to do all of the math, sawing, and sanding.
You still will have to do the assembly yourself. And sometimes, these assemble-yourself furniture projects can be almost as confusing as building the entire project. So you’ll have almost the same fun/frustration with the kit as when building it from scratch. (Kit or no kit, swearing is never optional.)

Dorel Living Airlie Wood Bunk Beds
Here’s another kit for DIY bunk beds that’s a little cheaper if you need to save some cash. This one has a twin bed on top and a full bed on the bottom, which means the kids will be sure to fight over who gets the bigger bed. Fun times.

The Gruffalo
Once the bunk bed plans are finished, you need a good bedtime story. This one is a lot of fun. (No rapping, please … although the pattern of the writing makes it awfully damn tempting.)
Although we only recommend picks we really love, we may earn a commission on purchases made through links from our site. There are safety regulations when it comes to bunk beds, please use caution and follow any government recommended height/safety rules.
(All finished bunk bed photos from Home Depot)


